Today, we brought you something most important to you.You have seen a Contact Us page on most websites.It can be linked to the website's administrators.Also, this page is important for professionalism in a website.

Today, we brought you something most important to you.You have seen a Contact Us page on most websites.It can be linked to the website's administrators.Also, this page is important for professionalism in a website.And this can also be added to your blog site.So blogger contact us page can see the different ways.So let's talk about the Blogger Contact Us page.Now you are going to learn how to add official contact us page in Blogger.
This page can be used by anyone.That is, you can find the incoming information via this page.All your information will be sent to your email.That is, your blogger admin gmail account.The entire page will not get reloaded for sending the message.You will get the message as soon as one sends it. And, the deliverability is 100% as well.However, this process has three components.
1. Adding the Contact Gadget
1. Visit blogger.com and log in to your account. If you are running multiple blogs, you need to choose the desired blog from the list.
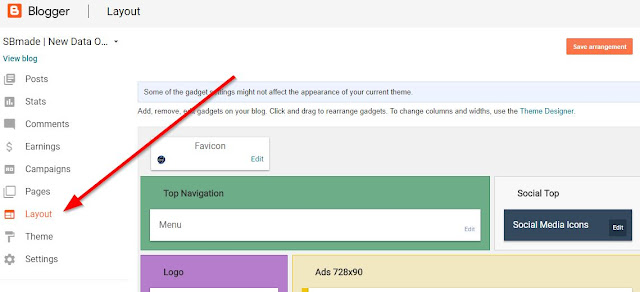
2. Now click on Layout from the left sidebar
 |
| Click the Layout |
3. You can see an Add a Gadget link on the main panel on the right side. Clicking on it will bring you to a list of gadgets.
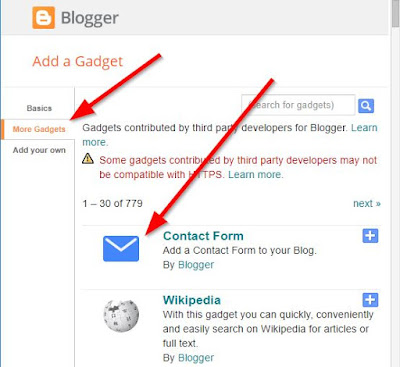
4. Then, choose More gadgets from the left side. Now, you will see Contact Form. Just add the same.
 |
| Contact Form Gadget |
Now you're done the first step.A normal blog does not show the Contact gadget.Because it damages the appearance of the site.So we need to hide it.
2. Hiding the Contact Form Gadget
1. To do this, click on Theme from the left menu on the blogger dashboard .
2. Then, click on Edit HTML and you will be provided with the whole code of your blog in a large field.
 |
| Click Theme and Edit HTML |
3. Now use Ctrl+F and search for ]]></b:skin> and place the following code just before it.
[#ContactForm1{display: none !important;}]
 |
| Blogger Contact Form Hide |
4. Then, click Save theme to retain the changes.
Now our second step is over.You will see hide the contact form you added.However, our blogger contact us page requires the steps above(Contact Form Gadget.).Now we are starting the final step.This is creating a contact page.This means adding a contact form to a page
3. Adding a Contact Form to a Page
1. For this, click on the Pages in your blogger dashboard and click on New page.
2. Paste the following code into the HTML post editor after removing everything in it.
 |
| Paste Code |
[<style type="text/css">
.contact-form-widget{margin-left:auto;margin-right:auto;width:600px;max-width:100%;padding:0}hr{position:relative;height:.75em;border:0;overflow:hidden;margin:0}hr:before{content:"";display:block;position:absolute;top:0;left:0;height:.75em;width:5.1em;background:#0088ff;box-shadow:5em 0 0 0 #0088ff,10em 0 0 0 #000000,15em 0 0 0 #000000,20em 0 0 0 #000000,25em 0 0 0 #000000,30em 0 0 0 #000000,35em 0 0 0 #000000,40em 0 0 0 #0088ff,45em 0 0 0 #000000,50em 0 0 0 #000000,55em 0 0 0 #000000,60em 0 0 0 #000000}.contactf-name,.contactf-email{float:left;width:49.25%}.contactf-name{margin-right:1.5%}.contact-form-name,.contact-form-email,.contact-form-email-message,.contact-form-name:hover,.contact-form-name:focus,.contact-form-email:hover,.contact-form-email:focus,.contact-form-email-message:hover,.contact-form-email-message:focus{width:100%;max-width:100%;margin:25px 0 0;padding:10px;font-size:15px;color:#848383;border-color:#1f2024;border-width:2px 2px 4px;-webkit-box-shadow:none;-moz-box-shadow:none;box-shadow:none}.contact-form-name,.contact-form-email{height:40px}.contact-form-email-message{height:100px}.contact-form-button-submit,.contact-form-button-submit:hover{margin-top:25px;width:100%;height:40px;font-size:15px;color:#fff;text-align:center;text-shadow:0 1px 2px rgba(0,0,0,0.25);background:#0088ff;border:0;border-bottom:2px solid #000000;outline:none;cursor:pointer;-webkit-box-shadow:inset 0 -2px #D4685C;box-shadow:inset 0 -2px #000000}.contact-form-button-submit:active{top:1px;outline:none;-webkit-box-shadow:none;box-shadow:none}.contact-form-cross{border:medium none !important;box-shadow:none !important;padding:0 !important;height:11px !important;width:11px !important;}
</style><br /><div class="widget ContactForm" id="ContactForm22"><div class="contact-form-widget"><hr /><div class="form"><form name="contact-form"><div class="contactf-name"><input class="contact-form-name" id="ContactForm1_contact-form-name" name="Name" onblur="if (this.value == "") {this.value = "Name";}" onfocus="if (this.value == "Name") {this.value = "";}" size="30" type="text" value="Name" /></div><div class="contactf-email"><input class="contact-form-email" id="ContactForm1_contact-form-email" name="E-mail address" onblur="if (this.value == "") {this.value = "E-mail address";}" onfocus="if (this.value == "E-mail address") {this.value = "";}" size="30" type="text" value="E-mail address" /></div><div style="clear: both;"></div><div class="contactf-message"><textarea class="contact-form-email-message" cols="25" id="ContactForm1_contact-form-email-message" name="Type your message here..." onblur="if (this.value == "") {this.value = "Type your message here...";}" onfocus="if (this.value == "Type your message here...") {this.value = "";}" rows="5" type="text" value="Type your message here..."></textarea><input class="contact-form-button contact-form-button-submit" id="ContactForm1_contact-form-submit" type="button" value="Send Message" /><br /><div class="contact-form-error-message" id="ContactForm1_contact-form-error-message"></div><div class="contact-form-success-message" id="ContactForm1_contact-form-success-message"></div></div></form></div></div></div><div style="text-align: justify;"><br /></div>]
3. Add a title (like Contact Us) and then change the settings given right as given below.
 |
| Create Contact Us Page and Publish it |
4. Finally, click the Publish button. That’s all.
The messages send from this contact form will be delivered to the admin email. If the blog has more than one admin, all of them will get it.
However, for your convenience, we will present a video.By doing so, you can understand this Tutorial.
However, for your convenience, we will present a video.By doing so, you can understand this Tutorial.
READ:
So you know about How to Create Contact Us Page in Blogger, Hope you like the post, don’t forget to share it with your friends and leave a comment below if you are facing any problem at any step in the method discussed above.Thank you.


does this method work with any blogger theme (ex:Dynamic Views)?
ReplyDeleteYes, of course.It works very well.
Delete